Well it sure has been a while since I last published a post hasn't it? In between field trips, multiple playdates and the enjoyment of the last warm summer days, my time spent at the computer has been cut dramatically but it hasn't prevented me from going shopping for back-to-school basics on one of our rainy days last week. Among the items on my list was of course the classic wax crayon pack. Who can forgo this staple? Every year, it seems like I buy a new pack or two; not because ours have been worn to nothing, mind you, but mostly because a few have broken in our pack and the children now refuse to use those despite mine taping them back together with masking tape (works great by the way!). On top of that, one must admit that the price of crayons at the back-to-school sales is quite amazing (19 cents, really?). Even if you don't need them, your brain almost tricks you into buying them because if you end up needing them later, you very well know they will be at least five times that price down the road...So I left the store with two packs of 24 brand new crayons (one for Zahavah and one for Adrian). I then decided it was time to figure out what to do with the broken crayons. After all, the kids were not suddenly going to start using them, right? It was time to recycle the old broken crayons into new crayons. What a "wicked" plan I thought: the broken crayons the kids had refused to draw with would, in the end, be used? hehehe I almost felt like I was sneaking medicine in their ice cream! :)
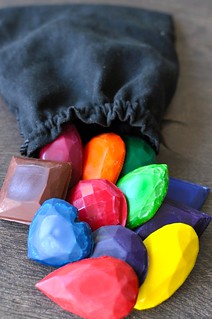 |
| Recycle your broken crayons into these little gems! |
I first gathered all the broken crayons accumulated over the last two years (not including the washable kind as I was told they would leave a white waxy residue) and removed the paper surrounding the crayons. In many cases, I was lucky...the kids had already done that! :) I then sorted the crayons by color and broke them in more pieces so they'd melt faster. I kept all the divided colors in paper cups (I used small "bathroom cups"). Adrian helped too. He broke some crayons and helped sort the colors so kids can definitely help with this process. After that, it was time to melt the crayons. I turned my oven on to 160C (325F), put my paper cups on a baking sheet and put the baking sheet in. Please be aware that paper cups are not supposed to be used for hot liquids according to most manufacturers. Check the label on your box before proceeding (my cups were for cold liquids only and I still used them but I put only 2-3 crayons in each and made sure to stay above the countertop when pouring in case the bottom of a cup would fall out and had no issues but it doesn't mean nobody will...)
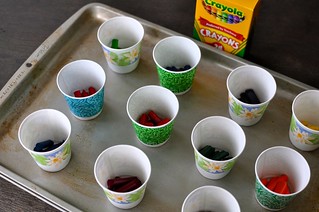
Sorted, broken, peeled crayons ready for melting
During this time, I sprayed a non-stick spray on my candy mold so the crayon wax would not stick to my plastic mold. My mold is heat resistant to 170C by the way so I knew my wax would not melt my mold during the pouring process. Be sure you check yours as well.
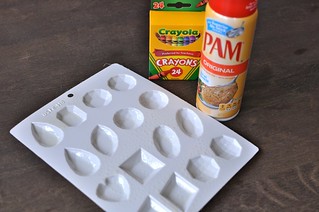
Oiled candy mold ready for pouring
After 10 minutes, all my crayons were melted (I had 2-3 crayons per small cup) so I took the baking sheet out of the oven using an oven mitt (I did check after five minutes using a toothpick), and quickly poured the melted wax into the molds. The paper cup themselves were warm to the touch but not hot (unless I would have touched at the level of the wax of course, which would have been) so I used my bare hands right out of the oven to handle the cups but I had to be careful not to let the wax touch my fingers. Oven mitts are highly recommended for the pouring of the wax of course. We do not all have the same definition of what's warm and what's hot! :)
I let the mold sit on the countertop for half an hour after the pouring was finished and then I put it in the refrigerator for another half an hour. After that, the crayons were hard and ready and came right out of the mold with a light touch of my finger (they just slipped out thanks to the oily spray). I simply took them out one by one so they wouldn't break but a faster way might be to put a towel on top of the mold and then turn the towel and mold over. I just didn't want to chance it. :)
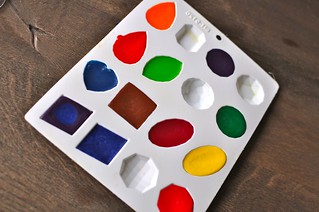
New wax crayons in the making and resting
I chose this mold (purchased on Ebay by the way) with Zahavah's Princess themed week in mind. (coming up in October) I thought having "gem" crayons would be fun for her and yet, not too difficult for me to make since this is my first time making "recycled crayons". I quite enjoyed the experience. If it didn't take this many crayons (see how some of my molds are not filled? And yet I used about 30 crayons for that!) and if the paper wasn't always glued to the crayons (it can be difficult to remove at times), I would definitely consider making more fun shaped crayons and offer them as presents for the kids's friends...Until then, we'll have to wait until more crayons break! :)
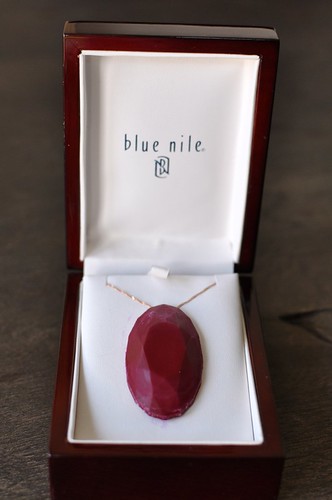 |
| Beautiful crayon "pendant" for my beautiful little girl! |
* * *
Your comments make my day !
(Please note : comments won't be visible until after my approval!)
* * *
This post was shared with these wonderful blogs and websites this week:
The Kids Co-Op, Show-and-Share Saturday, Link & Learn, TGIF, Share it Saturday, Mom's Library, The Sunday Showcase, Sun Scholars's For the Kids Friday, Tuesday Tots, Preschool Corner &5K, Serenity Saturday, Kids in the Kitchen, Discover & Explore, and We Made That.
If you would like me to link up with you, please don't hesitate to ask, it might take me a week or two, but I generally do!
Cute idea!
ReplyDeleteThank you. I couldn't think of a better theme for recycled crayons! I know this mold will be great for chocolates too later! :) Yummy!
DeleteThe crayon jewels came out great! I am curious as to how you attached the crayon pendant to the necklace? It looks very regal! I'm sure your daughter must be very excited. Thank you for sharing on Artsy Play Wednesday. I pinned it.
ReplyDeleteThank you Theresa! For a first try, I was happy. They're not as perfect as the ones I see being sold in etsy stores but they'll be loved I'm sure. I didn't have any play jewelry so I used one of my own pendants for the picture and simply taped the crayon to the chain for the effect but if I do get my hands on some cheap chain I may be able to permanently seal it in by pouring a bit more hot crayon wax on the back. :)
DeleteI've seen a lot of people melt crayons...I need to try it. And I must say yours are by far the prettiest ones I've seen!
ReplyDeleteAre they really? Thank you. I'm very perfectionist and after browsing Etsy listings, I felt mine were ok but I wasn't 100% satisfied. LOL The process was fairly and fast easy though so you should give it a try. The longest past is the peeling of the crayons and the cooling of the newly made crayons. Good luck!
Deleteoh fun are these? they'd make great party favors! thanks for linking up to Kids in the Kitchen! :)
ReplyDeleteThey would make for nice favors. I am still considering the possibility as my daughter wants a "Princess" themed birthday but as it takes many crayons to shape these, the debate is still ongoing...Buying crayons to break and melt them just seems so silly somehow...LOL
DeleteI love these!! They'd make a great gift for birthdays, too!
ReplyDeleteI'm sure they'd make kids very happy. My son saw them and was very excited. Homemade presents are always a hit too! :)
DeleteI love any craft that makes good use of 'used' items. This craft-cycle is definitely a winner. Is the mold a silicone mold?
ReplyDeleteThank you! This is actually a white plastic mold regularly used for candies but silicone molds work too. You can also use a muffin pan/mini muffin pan if you want and simply put the crayons at the bottom. Gives you simple round crayons but if you put one color, let cool and then add another, let cool and another, if can make "rainbow crayons" and kids usually think it's really neat even if they're just round.
DeleteWe're doing a pirate unit sometime this year (we homeschool) and this would be great to go in the treasure box! Thank you!
ReplyDeleteIt absolutely would. We did a pirate unit last year actually with my then preschooler but I hadn't made these crayons yet. :( They would have fitted in perfectly though, you are right! Thanks for stopping by Kate!
DeleteThanks for linking up to Tuesday Tots. I'm featuring this lovely post this week on Learn with Play at home :)
ReplyDeleteThank you Deborah! Such an honor to be featured on Learn with Play at Home! :) I'm glad you like the post and hope other folks will enjoy recycling their old crayons into these beautiful little gems (or other shapes!) for the children in their lives. :)
DeleteNever seen them made this way - very clever! They turned out so pretty!!
ReplyDeleteThanks for linking up to TGIF! Have a great week!
Beth
Thank you. I just figured it would be easier than guessing how many broken crayons to put into molds. I'm sure I'd underestimate or overflow and waste! :) Thanks for stopping by Beth!
DeleteMy grandaughter is obsessed with breading hee crayons and peeling the paper off. You made this look so easy. I am going to give it a try. Thanks
ReplyDeleteYou're welcome. I'm glad it's inspiring you to try. It's really not difficult nor long, especially if the crayons are peeled. I'd gladly make more if I had more peeled and broken crayons! :)
DeleteThese are SO cute!! They would make such a fun gift too. Thanks for sharing and linking up. :)
ReplyDeleteThank you Jolanthe! I did think about making more for presents ad my daughter wants a "princess-themed" birthday party this year but I am still debating whether it's worth buying new crayons to peel and break to melt them into these gems! :) We'll see I guess.
DeleteThese are definitely the best recycled crayons I have seen! I am sure you could find moms who would donate their broken crayons for your daughter's party :)
ReplyDeleteThat'd be awesome! :) I guess I'll have to ask around for donations a few weeks prior! :) Thanks for the suggestion! :)
Delete~Wow these are amazing. I love them. Such a fun idea and a great way to use up old crayons too.
ReplyDeleteIt is so cool I've featured it on The Sunday Showcase this week: http://www.herecomethegirlsblog.com/2013/09/14/cool-crafts-kids.html
Thank you Rebecca! Glad my recycled crayons are a hit! Thank you for the feature too by the way! :)
DeleteI don't know if they still are, but long ago the bottom of a paper cup was held to the cup by using wax. When we were young, my brother had a kit that made candles. He decided to experiment making other shapes than the molds that the kit came with. His first try was a "Dixie" cup. He melted the wax and poured it into the Dixie cup, but when he picked up the cup to move it, the bottom fell out and hot wax poured down his leg giving him a nasty little burn and a bald leg when he had to peel the wax off his hairy leg... lol (the original leg waxing treatment... lol) I am sure the wax was much hotter than what your instructions say, but I was just worried about liability for you if what happened to my brother happened to you. :)
ReplyDeleteI'm so sorry to hear about your brother! That must have hurt. I honestly have no idea whether my paper cups are Dixie brand or held by wax at the bottom but...paper cups are not supposed to be used for hot liquids so I guess the bottom could fall out. My cups cooled very fast, had almost not liquid in them and were not that hot but I guess if they were to be held by wax at the bottom, then that wax might melt too, even at such a temperature as that is what I was doing with the crayons. Thank you for sharing your story and sorry again about your brother. Experiments don't always end well I guess... :(
DeleteI may have missed this if someone else asked, but where did you get that amazing mold? I love it!
ReplyDeleteEbay! I believe the seller shipped worldwide as well. I simply typed in gem candy mold and looked for one I liked. :)
DeleteUse a razor blade to cut and easily peel the paper off crayons. :)
ReplyDeleteBelieve it or not, I ended up using a dull Army Swiss Knife blade in the end. :) I'm too scared if razor blades but a dull blade from a little knife I use to open boxes all the time, I'm not as shy! :) Thanks for the tip Marina! :)
DeleteI love the way they look as jewels! So cool! :) Could I offer another way to do this activity? It doesn't involve an oven, and is easily adaptable so that a child can do this with you:
ReplyDeleteMaterials: crayons, cheese grater or butter knife, plastic or silicone mold, spoon, desk/study lamp with movable head, 75-100W incandescent bulb (MUST be incandescent!), toothpicks
- If the crayons are big enough, shred them into shavings with an old cheese grater. (If the child is too young to do that, s/he can scrape the crayon with a butter knife.)
- Spoon the shavings into the molds. Have the child experiment with different techniques: layer each color one at a time, mix 2 or 3 colors together, do two halves each a different color, etc.
- When the molds are filled, put it next to the desk lamp. Lower the head of the lamp until the shade is covering the entire mold and is ALMOST touching the desk, but is also just high enough that you both can watch the shavings melt. (If the mold is too big, you'll have to do this in sections, or you can just cut the mold into smaller sections.)
- When the shavings are melted, you can raise up the lamp and (if you want) use toothpicks to swirl together the now-liquid colors.
- Let the crayons cool, then pop them out and have fun with them!
I stumbled on this method one summer when I was about 10 or 12 and REALLY bored (only I shaved the crayons with an old pair of scissors and I melted them in old Play-Doh molds!) Because you're not transferring hot liquid and you're using a much more controllable heat source, it's safer to do with kids. And it provides great learning opportunities for concepts like color mixing, radiant heat, how energy transfers from one form to another (light -> heat), etc.
Sure can. There are many ways to melt crayons and make them. I made the ones shows above myself because of the age of my children and because I want them to be a surprise for my daughter when we do a princess themed week but using a grater when she is older and supervised would be in line with our Montessori curriculum. I don't think I would have her do all of it though. I'm sure this method is quite time consuming although it is rewarding and educational for the child. I'd probably stick to one or two crayons at first depending on their speed with the grater and might experiment with the lamp to see how long it takes to melt. Young kiddos tend to like quicker results! :) Thank you for sharing this method. I will keep it in mind for when my children get older and I think some of my readers might try your method if they have older kids at home! :) Have a good day!
DeleteIf you soak the crayons in water first the paper usually peels right off. Also - if you check with your local elementary schools, after a certain time, kindergarten classes usually throw out all their old crayons and get a new box. I have my teachers save the old crayons in an ice cream bucket for me and then I have more than enough crayons to melt when I want to without the expense of buying them to melt them. As a side help - the kindergarteners have usually peeled the paper off by the time I get them. :) I love your ideas! Thanks for sharing.
ReplyDeleteGood to know for the future! I've been using a little knife for now to remove the paper and overall, it works well but it's not magical either! :) Once my child starts attending Grade school, I'll have to ask about old crayons. For now, his German Kindergarten doesn't use crayons at all; only colored pencils but thanks for the idea. I wouldn't have thought of that at all!
DeletePensando en celebrar el Día del Niño en mi preescolar con tema de "Princesas y Piratas" esta idea de las joyas-crayones me viene muy bien! Pasaré por las aulas de los demás grupos a recolectar crayones rotos hehehe..! Tengo unos moldes de formas de corazón y estrellas, tal vez pueda usarlos y y hacerles facetas a las joyas con un cutter..Gracias por esta gran idea!
ReplyDeleteMe alegra saber que usted ha encontrado un buen uso de mi idea. Definitivamente, hay joyas en forma de corazón y algunos estrellas de mar en el fondo del océano, así que creo que va a hacer muy bien en su actividad! Estoy seguro que los niños van a ser muy feliz. Buena suerte y gracias por comentar!
DeleteThanks foor the Idea..
ReplyDelete